
No products in the cart.


Journal
The Ultimate Scrapbook Embellishments Guide: Types, Techniques & Tips for Every Crafter
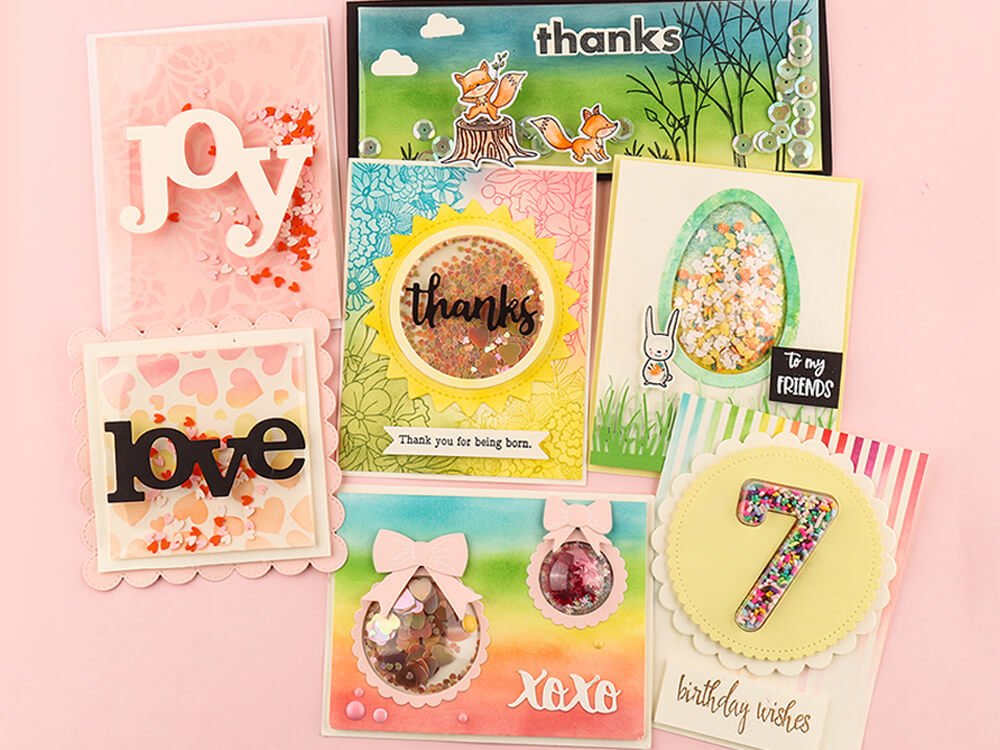
Open any beautifully crafted scrapbook page and you’ll notice something: it’s never just photos and paper. The details that make a page feel alive, textured, and personal are the embellishments — the small decorative elements that transform a simple photo album into a visual story. Whether you’re a seasoned scrapbooker or just getting started, understanding embellishments is the key to taking your pages from good to unforgettable.
In this guide, we’ll walk through every major type of scrapbook embellishment, how to choose and combine them thoughtfully, the techniques that make layouts sing, and practical tips for keeping your stash organized.

$8.99
What Are Scrapbook Embellishments?
Scrapbook embellishments are decorative elements added to a page to enhance its visual appeal, add dimension, and express personal style. They include anything from stickers and die cuts to ribbons, sequins, enamel dots, stamps, and more. The right embellishments can:
- Draw attention to your photos and focal points
- Reinforce the theme or mood of your layout
- Add texture, color, and visual interest
- Fill empty space in a way that feels intentional, not cluttered
- Tie together disparate photos into a cohesive story
The beauty of embellishments is that one set of supplies can create dozens of different looks depending on how you arrange, layer, and combine them.
The 9 Main Types of Scrapbook Embellishments
Here’s a comprehensive breakdown of the most popular embellishment categories and what makes each one special.
| Type | What It Is | Best For |
|---|---|---|
| Stickers | Pre-made adhesive decorations; vinyl, paper, or puffy | Titles, accents, quick decoration |
| Die Cuts | Shapes cut from paper, chipboard, or other materials | Themed accents, layering, focal points |
| Chipboard | Thick, sturdy cardboard pieces — plain or pre-printed | Heavy-duty accents, titles, frames |
| Ephemera | Vintage-style paper pieces: tags, tickets, postcards, labels | Shabby-chic, travel, heritage layouts |
| Washi Tape | Japanese masking tape in decorative patterns | Borders, dividers, layering, holds (repositionable) |
| Enamel Dots & Shapes | Small dome-shaped colored accents | Quick finishing touches, color pops |
| Buttons, Sequins & Gems | Small shiny embellishments in various materials | Sparkle, texture, flower centers, eye-catchers |
| Stamps & Stamped Images | Rubber or clear stamps with ink for direct use or fussy-cutting | Custom images, backgrounds, layering |
| Ribbon, Twine & Fibers | Fabric, string, and yarn trims | Softness, movement, tying, bow embellishments |

$8.99
Stickers
Stickers are the most accessible entry point into embellishing. From simple alphabet stickers for titles to themed packs featuring animals, florals, and travel motifs, they add instant personality with zero skill required. Puffy stickers add delightful dimension, while vinyl stickers offer a clean, modern finish.
Die Cuts
Die cuts are shapes produced by cutting dies — either pre-cut from a pack or cut at home with a die cutting machine. They range from simple circles and hearts to intricate floral clusters and layered scenes. At Sumflying Craft, our metal cutting dies let you create your own die-cut embellishments in any paper, giving you complete creative control over shape, size, and color.
Chipboard
Chipboard is thicker and more substantial than standard paper die cuts, giving your embellishments real presence on the page. Pre-decorated chipboard pieces work great straight out of the package, or you can paint, ink, or stamp plain chipboard to match any color scheme.
Ephemera
The word “ephemera” originally described paper items intended for short-term use — tickets, receipts, postcards, and labels. In scrapbooking, ephemera brings authentic vintage charm and a sense of real history to your pages. Coordinated ephemera packs are widely available and make it easy to add this look without hunting for actual antiques.

$4.90
Washi Tape
Washi tape is a Japanese masking tape made from rice paper, known for its beautiful patterns, translucent quality, and — crucially — the fact that it’s repositionable. That makes it incredibly versatile: use it as a border, tear it into pieces for a collage effect, layer it over photos, or twist it into spirals. Our washi tape collection includes vintage English text, rose-themed, and seasonal designs.
Enamel Dots & Shapes
These small dome-shaped embellishments are one of the fastest ways to add a pop of color or a finishing touch to any layout. Place three dots in a cluster near a photo corner and you instantly have a cohesive, intentional design element. They come in nearly every color imaginable and in shapes beyond dots — stars, hearts, leaves, and more.
Buttons, Sequins & Gems
Nothing adds sparkle quite like sequins, and nothing adds tactile depth quite like buttons. Our Crystal Sequins (10g/bottle) are perfect for scattering across a layout or filling a small shaker window. Mix different sizes and finishes — matte buttons paired with glossy sequins, or gold hoops contrasted with pearl strands — for maximum visual impact.
Stamps & Stamped Images
Stamps are both a tool and an embellishment. Direct stamping onto your page creates instant backgrounds or repeated motifs. Alternatively, stamp on specialty paper and fussy-cut the images to layer as embellishments — this gives you color control and creative flexibility that pre-made pieces can’t match.
Ribbon, Twine & Fibers
Fabric trims bring softness and organic movement to the typically flat medium of paper. A length of ribbon tied around a photo cluster, a strand of twine threaded through a punched hole, or fibers tucked under a corner — these small touches ground the page and create visual flow.
How to Choose Embellishments for Your Layout
Having supplies is one thing — knowing how to use them well is another. Here are four guiding principles that professional scrappers use to make intentional, beautiful choices.

$18.69
1. Match Your Color Palette
Before grabbing embellishments, study your photos and patterned papers and pull out 3–5 colors that appear across them. Choose embellishments that reinforce those colors — not compete with them. A cohesive color story makes even mismatched embellishments feel unified. Coordinated kits and collections take the guesswork out of this step.
2. Mix Dimensions
The most interesting scrapbook pages have a mix of flat and dimensional elements. Combine flat stickers and die cuts with puffy elements, beads, or chipboard to create visual hierarchy and depth. A page that’s entirely flat feels one-note; adding even one or two raised elements transforms the whole composition.
3. Follow the Rule of Odds
Groups of 3 or 5 almost always look better than groups of 2 or 4. Odd numbers are naturally more dynamic and visually pleasing — they create movement rather than rigid symmetry. When in doubt, cluster embellishments in threes.
4. Less Is Often More
It’s tempting to decorate every inch of a page, but restraint is a skill. If your page has multiple photos or busy patterned papers, use fewer embellishments so the page doesn’t become visually exhausting. Conversely, if you have a single photo on a plain background, you have more room to play. Match embellishment density to the complexity of your layout.
Pro Tip: The Simulation Dewdrop Sets (available in Large at $18.69 and Medium at $6.99) add an elegant translucent dimension that photographs beautifully — they’re especially stunning under artificial light or flash photography.
3 Embellishment Techniques That Make Layouts Stand Out
1. Clustering
Clustering means grouping multiple small embellishments together near a focal point — usually a photo corner or the title area. Build your cluster from large to small, mixing types (a chipboard shape, a sticker, a few enamel dots, a short ribbon piece). The cluster becomes a visual anchor that draws the eye and creates a sense of completeness.
2. Tucking
Tucking involves sliding a piece of ephemera, a small tag, or a paper strip partially under a photo or another element. This creates a sense of depth and layers that invites the viewer to look closer. The partially hidden element adds intrigue without competing with the photo.
3. Creating Visual Triangles
Place three similar embellishments in a triangle formation — perhaps at the top-left and bottom-right of a photo, with a third at the opposite corner. Triangular compositions are naturally balanced and guide the viewer’s eye through the entire layout in a pleasing, intentional path.

$4.90
Storing & Organizing Your Embellishments
A well-organized stash means you spend less time hunting and more time creating. Here are four approaches:
- By Type: Keep stickers, die cuts, enamel dots, and ephemera in separate compartments. Drawer organizers and small bins are ideal. This works best when you have a large collection and need to find specific items quickly.
- By Color: If you tend to think in palettes rather than categories, color-coding your embellishments makes it easy to grab exactly what matches your current project.
- By Theme or Project: Store all your travel-themed embellishments together, or keep all pieces for a specific ongoing project in one container. This is great for preventing partial sets from scattering.
- In Clear Containers: Transparency wins. You can’t use what you can’t see. Clear zipper bags, photo boxes, and acrylic drawer units let you scan your options at a glance.
Featured Embellishments from Sumflying Craft
Here’s a curated selection of our most versatile embellishments and craft accessories — chosen for quality, color range, and creative potential.


Scrapbook Embellishments FAQs
- What’s the best embellishment for a complete beginner?
- Start with washi tape and enamel dots. Both are inexpensive, easy to apply, and forgiving — you can reposition washi tape, and enamel dots require no adhesive at all. These two alone can elevate any layout from plain to polished.
- How do I attach dimensional embellishments without damaging my photos?
- Foam adhesive dots are the safest choice — they add height and grip without liquid adhesive touching your photos. For heavier items like chipboard, use a thin strip of double-sided tape or a foam square. Our Double-Sided Adhesive Dots Glue Tape ($5.90) is a scrapbooker’s essential for exactly this purpose.
- Can I make my own embellishments?
- Absolutely. Die-cut shapes from colored cardstock, stamp and fussy-cut images, paint or ink plain chipboard, punch shapes from patterned paper, or transform everyday objects like bottle caps, fabric scraps, and old postcards. The most personal embellishments are often the ones you make yourself.
- How many embellishments should I use on one page?
- A good rule of thumb: 5–10 embellishments on a single-page layout, 10–20 on a two-page spread. If your photos are busy or your paper has a strong pattern, go lighter. A clean, simple photo on plain paper gives you more room to embellish. Always ask: does each element add something, or is it just filling space?
- What’s the best way to store embellishments long-term?
- Keep them away from heat, moisture, and direct sunlight — these can warp paper, fade colors, and degrade adhesives. Airtight plastic bags or sealed containers with descant packets work well. Sort by category or color in compartments you can see through, and revisit your stash seasonally to rediscover neglected treasures.
Ready to Embellish? Browse our full range of scrapbook embellishments, washi tapes, craft tools & more at Sumflying Craft. Free shipping on orders over $35.
 New Arrivals
 Best Sellers
 All Product
 Latest deals